0%
Theme NexT works best with JavaScript enabled
前言
目的:iOS逆向开发中经常使用的Reveal、SSL Kill Switch 2等工具都是依附于设置而存在的,本文就是做一个这样的应用
环境:macOS10.14.6、Xcode11.3
适配:iOS11.0-iOS最新
新建
nic.pl新建App1 2 3 4 5 6 7 8 9 10 11 12 NIC 2.0 - New Instance Creator ------------------------------ ... [7. ] iphone/preference_bundle_modern ... Choose a Template (required): 7 Project Name (required): Test Package Name [com.yourcompany.test]: com.test.www Author/Maintainer Name [drag]: xxoo [iphone/preference_bundle_modern] Class name prefix (three or more characters unique to this project) [XXX]: Instantiating iphone/preference_bundle_modern in test/... Done.
创建后,目录结构如下图1 2 3 4 5 6 7 8 9 10 11 12 # drag @ dragdeMacBook-Pro in ~/Desktop/OCTest/test [18:01:00] $ tree . ├── Makefile ├── Resources │ ├── Info.plist │ └── Root.plist ├── XXXRootListController.h ├── XXXRootListController.m └── entry.plist 1 directory, 6 files
更改Makefile配置
目前支持的架构有armv7 armv7s arm64 arm64e等
添加ARCHS = armv7 armv7s arm64 表示支持 armv7 armv7s arm64 三种处理器架构
对于最新的A12处理器(iPhoneX以后)的设备,需要添加arm64e,否则生成的dylib文件不能正常加载
本文只适配64位架构设备,设置如下:ARCHS = arm64 arm64e
指定目标规范: TARGET = iPhone:BaseSDK:DeploymentTarget
BaseSDK代表编译用的SDK版本Deployment Target是最低兼容的系统版本,本文初始设置TARGET = iPhone:latest:11.0
编译
make编译出现找不到私有库Preferences.framework的错误,Preferences.framework包含在PrivateFrameworks里面,本文采取的是下载整个sdk1 2 3 4 5 6 7 8 9 10 11 12 $ make > Making all for bundle Test… ==> Copying resource directories into the bundle wrapper… ==> Compiling XXXRootListController.m (arm64)… ==> Linking bundle Test (arm64)… ld: warning: directory not found for option '-F/Applications/Xcode.app/Contents/Developer/Platforms/iPhoneOS.platform/Developer/SDKs/iPhoneOS13.2.sdk/System/Library/PrivateFrameworks' ld: framework not found Preferences clang: error: linker command failed with exit code 1 (use -v to see invocation) make[3 ]: *** [/Users/drag/Desktop/OCTest/test/.theos/obj/debug/arm64/Test.bundle/Test] Error 1 make[2 ]: *** [/Users/drag/Desktop/OCTest/test/.theos/obj/debug/arm64/Test.bundle/Test] Error 2 make[1 ]: *** [internal-bundle-all_] Error 2 make: *** [Test.all.bundle.variables] Error 2
从https://github.com/xybp888/iOS-SDKs下载iPhoneOS13.0.sdk放入theos/sdks。
因为本人Xcode版本是11.3,所以下载iPhoneOS13.0.sdk,可以根据自己的Xcode版本选择合适的sdk
如果从github下载过慢,可以通过gitee中转一下。
Makefile里面更改TARGET = iPhone:13.0:11.0
下载的sdk版本为13.0,BaseSDK是填入13.0
适配版本11.0,DeploymentTarget填入11.0
make编译通过 1 2 3 4 5 6 7 8 9 10 11 12 13 14 15 16 17 18 19 20 21 22 23 $ make > Making all for bundle Test… ==> Copying resource directories into the bundle wrapper… ==> Compiling XXXRootListController.m (arm64)… ==> Linking bundle Test (arm64)… ==> Generating debug symbols for Test… ==> Compiling XXXRootListController.m (arm64e)… ==> Linking bundle Test (arm64e)… ==> Generating debug symbols for Test… ==> Merging bundle Test… ==> Signing Test… ```` # * `make package`打包报错,提示缺少control文件 ```shell $ make package > Making all for bundle Test… ==> Copying resource directories into the bundle wrapper… make[2]: Nothing to be done for `internal-bundle-compile'. > Making stage for bundle Test… ==> Error: /Applications/Xcode.app/Contents/Developer/usr/bin/make package requires you to have a layout/ directory in the project root, containing the basic package structure, or a control file in the project root describing the package. make: *** [internal-package] Error 1
新建control文件,填入如下内容1 2 3 Package: com.test.www Architecture: iphoneos-arm Version: 0.0.1
再次make package,成功,生成deb包1 2 3 4 5 6 $ make package > Making all for bundle Test… ==> Copying resource directories into the bundle wrapper… make[2]: Nothing to be done for `internal-bundle-compile'. > Making stage for bundle Test… dm.pl: building package `com.test.www:iphoneos-arm' in `./packages/com.test.www_-2+debug_iphoneos-arm.deb
安装
执行make install进行安装,安装成功后可以去设置里面查看有没有Test,
如果没有发现,是因为没有安装PreferenceLoader,需要在Cydia中安装PreferenceLoader
如果发现了,那是因为其它插件对PreferenceLoader有依赖,安装插件的时候就顺带安装了
PreferenceLoader
是一个开源的基础依赖包,越狱插件的系统设置菜单是由它提供的,最好在iphone/preference_bundle_modern开发前进行安装
进入系统设置时,PreferenceLoader会从/Library/PreferenceLoader/Preferences/目录下解析符合规则的plist文件,并生成相应的控件动态添加到系统设置中
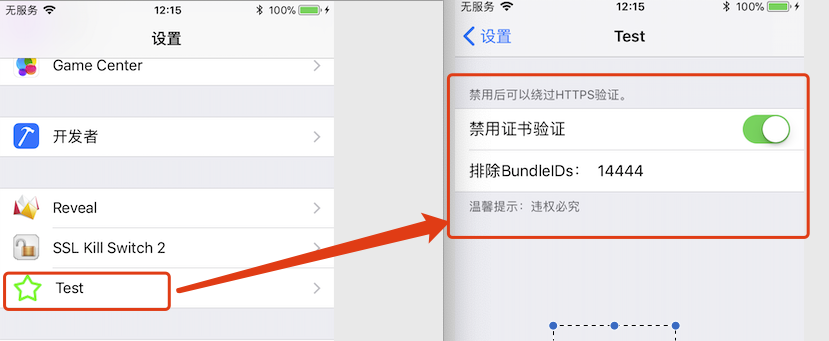
实战一:构造SSL Kill Switch 2样式的App 最终效果图
构造过程
打开上面创建的项目,找到entry.plist文件。entry.plist描述了设置菜单项看到的内容,更改后的内容如下1 2 3 4 5 6 7 8 9 10 11 12 13 14 15 16 17 18 19 20 21 <?xml version="1.0" encoding="UTF-8"?> <!DOCTYPE plist PUBLIC "-//Apple//DTD PLIST 1.0//EN" "http://www.apple.com/DTDs/PropertyList-1.0.dtd"> <plist version="1.0"> <dict> <key>entry</key> <dict> <key>bundle</key> <string>Test</string> <key>cell</key> <string>PSLinkCell</string> <key>detail</key> <string>XXXRootListController</string> <key>icon</key> <string>test.png</string> <key>isController</key> <true/> <key>label</key> <string>Test</string> </dict> </dict> </plist>
cell:cell类型,这里是PSLinkCell类型,表示是一个可以点击的控件,更多控件类型参考
detail:XXXRootListController,表示点击后跳转到此控制器
icon:该cell前面显示的图标,图标test.png需要存储在Resources文件夹下面。
label:该cell前面显示的文字
当执行make install安装后,theos会做两件事情
在/Library/PreferenceLoader/Preferences/文件夹下新建和项目同名的plist文件,比如Test.plist
把entry.plist内容拷贝一份存储到Test.plist,进入设置时会读取该plist文件,生成相应的cell
Resources文件夹:存放项目需要的资源文件,比如图片,比如构建控制器需要的plist文件
Root.plist描述XXXRootListController的视图结构,更改里面相应的值,可以更改控制里面看到的内容
目前项目只有一个控制器,如果我们需要定义另外的控制器CustomListController,那么就需要新建一个custom.plist文件描述此控制器的内容。
test.png,设置菜单项看到的图片资源
打开XXXRootListController控制器后发现其内容是由Root.plist构建。1 2 3 4 5 6 - (NSArray *)specifiers { if (!_specifiers) { _specifiers = [self loadSpecifiersFromPlistName:@"Root" target:self ]; } return _specifiers; }
更改Resources/Root.plist内容如下:1 2 3 4 5 6 7 8 9 10 11 12 13 14 15 16 17 18 19 20 21 22 23 24 25 26 27 28 29 30 31 32 33 34 35 36 37 38 39 40 41 <?xml version="1.0" encoding="UTF-8" ?> <!DOCTYPE plist PUBLIC "-//Apple//DTD PLIST 1.0//EN" "http://www.apple.com/DTDs/PropertyList-1.0.dtd" > <plist version="1.0" > <dict> <key>items</key> <array> <dict> <key>cell</key> <string>PSGroupCell</string> <key>label</key> <string>禁用后可以绕过https验证。</string> <key>footerText</key> <string>温馨提示:违权必究</string> </dict> <dict> <key>cell</key> <string>PSSwitchCell</string> <key>defaults</key> <string>com.test.www</string> <key>key</key> <string>isDisCerVarify</string> <key>label</key> <string>禁用证书验证</string> <key>default </key> <false /> </dict> <dict> <key>cell</key> <string>PSEditTextCell</string> <key>defaults</key> <string>com.test.www</string> <key>key</key> <string>excludedIDs</string> <key>label</key> <string>排除BundleIDs:</string> </dict> </array> <key>title</key> <string>Test</string> </dict> </plist>
defaults 用户操作控件得到的值存储到/var/mobile/Library/Preferences/com.test.www.plist文件中
key 在defaults中用于关联该cell的键值
default 表示存储在com.test.www.plist中的默认值
整个构建过程到这里就结束了,执行make && make package && make install后,重新打开设置App就会看到如上图所示的内容
与tweak交互
上面只是做了UI方面的操作,没有实际的功能是没有任何用的。要想发挥作用,必须与tweak进行交互。
新建tweak,BundleID填写com.apple.UIKit表示可以拦截任何App,也就是所有App启动都会走Tweak.x中的%ctor {}初始化函数1 2 3 4 5 6 7 8 9 10 11 12 13 14 15 16 $ nic.pl NIC 2.0 - New Instance Creator ------------------------------ ... [9.] iphone/tool_swift [10.] iphone/tweak [11.] iphone/xpc_service ... Choose a Template (required): 10 Project Name (required): Tweak Package Name [com.yourcompany.tweak]: com.tweak.www Author/Maintainer Name [drag]: [iphone/tweak] MobileSubstrate Bundle filter [com.apple.springboard]: com.apple.UIKit [iphone/tweak] List of applications to terminate upon installation (space-separated, '-' for none) [SpringBoard]: Instantiating iphone/tweak in tweak/... Done.
Makefile文件增加以下内容1 2 TARGET = iPhone:13.0:11.0 ARCHS = arm64 arm64e
Tweak.x里面hook相应的方法来实现禁用证书的功能,核心代码里面调用shouldHookFromPreference()来判断某个App是否需要hook1 2 3 4 5 6 7 8 9 10 11 12 13 14 15 16 17 18 19 20 static BOOL shouldHookFromPreference() { BOOL shouldHook = NO; NSMutableDictionary *plist = [[NSMutableDictionary alloc] initWithContentsOfFile:@"/var/mobile/Library/Preferences/com.test.www.plist"]; if (!plist) { NSLog(@"Preference file not found."); return shouldHook; } shouldHook = [[plist objectForKey:@"isDisCerVarify"] boolValue]; // Root.plist里面填写的key // 查看过滤的bundleid NSString *excludedBundleIdsString = [plist objectForKey:@"excludedIDs"]; // Root.plist里面填写的key excludedBundleIdsString = [excludedBundleIdsString stringByReplacingOccurrencesOfString:@" " withString:@""]; NSString *bundleId = [[NSBundle mainBundle] bundleIdentifier]; bundleId = [bundleId stringByTrimmingCharactersInSet:[NSCharacterSet whitespaceCharacterSet]]; NSArray *excludedBundleIds = [excludedBundleIdsString componentsSeparatedByString:@","]; if ([excludedBundleIds containsObject:bundleId]) { NSLog(@"Not hooking excluded bundle: %@", bundleId); shouldHook = NO; } return shouldHook; }
Test项目和Tweak项目目前是分离的,都会生成相应的deb文件。难道实让用户安装两个deb包,这个用户体验好像不太好吧。有没有更简单的方式,答案是有的。
Tweak项目根目录新建layout文件夹
进入Test项目.theos/_/,找到Library文件夹,拷贝到layout文件夹下面。
Cydia里面卸载上面安装的Test App。进入Tweak项目,执行make && make package && make install进行安装,安装完成就可以在设置里面看到Test App的选项
现在只需要进入Tweak项目,把packages文件夹下的deb安装包发送给其他人就可以了,方便又快捷
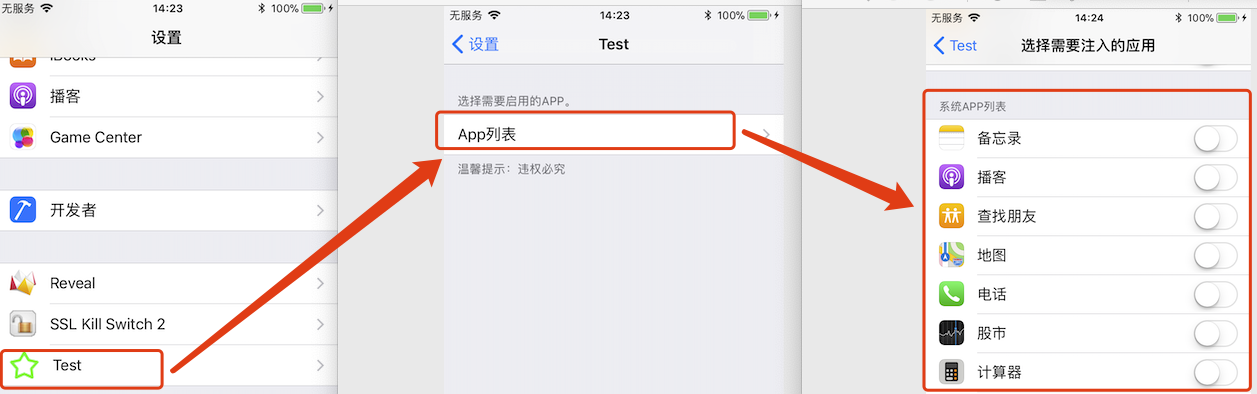
实战二:构造Reveal样式的App 最终效果图
构造与交互
大部分和实战一是相同的,这里只写出不同的地方。
如上图所示,获取了应用列表,这个功能是AppList插件提供的,所以在开发前要在Cydia里面搜索安装AppList。
更改Resources/Root.plist内容如下:1 2 3 4 5 6 7 8 9 10 11 12 13 14 15 16 17 18 19 20 21 22 23 24 25 26 27 28 29 30 31 32 33 34 35 36 37 38 39 40 41 42 43 44 45 46 47 48 49 50 51 52 53 54 55 56 57 58 59 60 61 62 63 64 <?xml version="1.0" encoding="UTF-8" ?> <!DOCTYPE plist PUBLIC "-//Apple//DTD PLIST 1.0//EN" "http://www.apple.com/DTDs/PropertyList-1.0.dtd" > <plist version="1.0" > <dict> <key>items</key> <array> <dict> <key>cell</key> <string>PSGroupCell</string> <key>label</key> <string>选择需要启用的App。</string> <key>footerText</key> <string>温馨提示:违权必究</string> </dict> <dict> <key>bundle</key> <string>AppList</string> <key>isController</key> <string>1 </string> <key>cell</key> <string>PSLinkCell</string> <key>label</key> <string>App列表</string> <key>ALNavigationTitle</key> <string>选择需要注入的应用</string> <key>ALSettingsPath</key> <string>/var/mobile/Library/Preferences/com.test.www.plist</string> <key>ALSettingsKeyPrefix</key> <string>TestAppEnabled-</string> <key>ALSettingsDefaultValue</key> <string></string> <key>ALSectionDescriptors</key> <array> <dict> <key>title</key> <string>用户App列表</string> <key>predicate</key> <string>isSystemApplication = FALSE </string> <key>icon-size</key> <string>29 </string> <key>suppress-hidden-apps</key> <string>1 </string> <key>cell-class -name</key> <string>ALSwitchCell</string> </dict> <dict> <key>title</key> <string>系统App列表</string> <key>predicate</key> <string>isSystemApplication = TRUE </string> <key>icon-size</key> <string>29 </string> <key>suppress-hidden-apps</key> <string>1 </string> <key>cell-class -name</key> <string>ALSwitchCell</string> </dict> </array> </dict> </array> <key>title</key> <string>Test</string> </dict> </plist
ALNavigationTitle 导航栏标题
ALSettingsPath 存储文件的路径,文件用来存储自己设置的值
ALSettingsKeyPrefix key的前缀信息
ALSectionDescriptors 各个部分信息的描述,本例中分成两个部分:用户App列表和系统App列表
当点击App列表里面的开关时,会动态更改com.test.www.plist文件里面对应的键值。进行交互时,读取相应的键值,做出自己的逻辑判断即可。
与Tweak进行交互1 2 3 4 5 6 7 8 %ctor { NSString *identifier = [[NSBundle mainBundle] bundleIdentifier]; NSMutableDictionary *plistDict = [[NSMutableDictionary alloc] initWithContentsOfFile:@"/var/mobile/Library/Preferences/com.test.www.plist"]; // 是否在用户APP列表点击开启了 if ([[plistDict objectForKey:[@"TestAppEnabled-" stringByAppendingString:identifier]] boolValue]) { } }
扩展 某个cell的点击操作
plist里面:cell为PSButtonCell表示可以点击,action表示执行的动作1 2 3 4 5 6 7 8 9 10 <dict> <key>cell</key> <string>PSButtonCell</string> <key>label</key> <string>我也要点击</string> <key>icon</key> <string>cydia.png</string> <key>action</key> <string>btnClicked</string> </dict>
控制器里面直接写上相应的方法1 2 3 - (void )btnClicked { NSLog (@"我被打印了" ); }
自定义cell
.h头文件里面导入PSSpecifier.h,继承PSTableCell1 2 3 4 5 #import <UIKit/UIKit.h> #import <Preferences/PSSpecifier.h> @interface CustomCell : PSTableCell @end
.m实现文件里面1 2 3 4 5 6 7 8 9 10 11 12 13 #import "CustomCell.h" @implementation CustomCell -(id )initWithStyle:(UITableViewCellStyle )style reuseIdentifier:(id )identifier specifier:(PSSpecifier *)specifier { self = [super initWithStyle:UITableViewCellStyleSubtitle reuseIdentifier:identifier specifier:specifier]; if (self ) { } return self ; } @end
控制器里面通过操作PSSpecifier来更新Cell界面的值。